Pool Table Cloth Installation Guide
A step-by-step guide to install cloth on a pool table, with illustrations.
Pool Table Cloth Installation Guide
Installing Cloth on the Pool Table's Surface
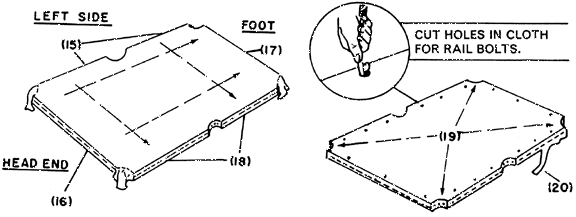
Lay the bed cloth over the top of the bed, with the playing surface up. Leave enough cloth at head and at the left side for tacking into bed. Leave the balance of the cloth over-hand at the right side and the foot. Note: Tacking can be done with ordinary tacks or with a hand stapler.
Tack cloth to bed (1) with two tacks about two inches apart.
Next: Stretch cloth across the table and tack at (2), with two tacks, two inches apart.
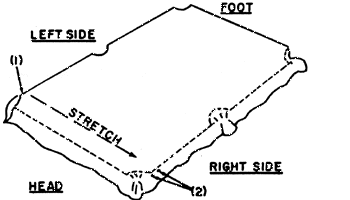
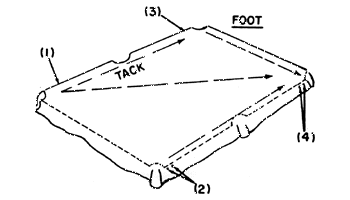
Stretch cloth from (1) to (3), and tack bed, at left side of table.
Next: Stretch cloth across from (3) and pull from (2) tacking cloth at (4).
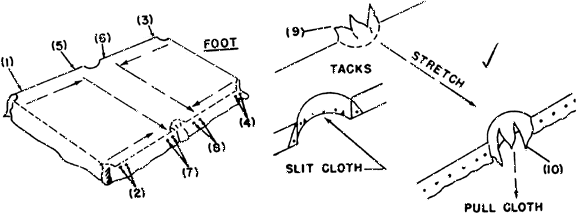
On the left side, stretch cloth from (1) toward side pocket and tack at (5).
Repeat, stretching cloth from (3) and tacking at (6).
On right side, stretch cloth across table from (5) and toward side pocket from (2) and tack at (7). Repeat, stretching cloth from (6) and toward side pocket from (4) tacking at (8).
Cut a short slit in cloth, in the center of the side pocket opening (9) and pull cloth downward, with grasp above slit, and tack below pocket opening.
Stretch cloth across table from (9). Repeat pocket operation at ( 10).
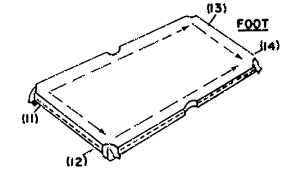
At head of table, tack cloth at (11). Maintain a uniform overhang of cloth.
Stretch cloth from (11) toward (12) and tack along bed maintaining an even amount of cloth at head end.
Stretch cloth front (11) to foot end and tack at (13).
Stretch cloth from (12) and (13) toward (14) and tack along bed.
Tack entire left side, tacks two (15) apart. Keep an even margin of cloth (16).
Next complete tacking of head end (17).
Now stretch cloth toward foot end of table, and tack (18). Stretch cloth across to the right side of table and tack.
Stretch cloth into comer pockets and tack.
(20) Trim off all excess, even with bottom of bed.
Installing Cushion Cloth
For pool tables with feather strip construction:
Prepare Rails
- Carefully remove old feather strips and save for re-use.

NOTE: Nap on side rails runs from head to foot. The nap on head and foot rails runs from left to right as viewed from the head end of the table.
- Carefully remove old feather strips and save for re-use.
Install Feather Strips
With rail face up, place new cloth on rail with playing surface down. Center cloth on rail, with approximately 4" of cloth at each end and 1/2" of cloth beyond the feather strip slot.
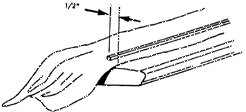
For comer pockets, tap feather strip in place except for 3" at each each. Start approximately 2" from end of feather strip and pull cloth toward rubber cushion until the edge of the cloth is approximately 1/4" from the end of the feather strip. Tap feather strip in place.
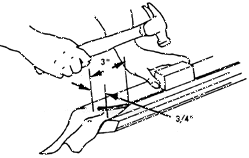
For side pockets, start approximately 3" from end of rail and pull cloth toward rubber cushion until the edge of the cloth is approximately '4" from the end of the feather strip. Tap feather strip in place.

Pull cloth tight end and tap feather strip in place, then trim cloth along cushion side of feather strip. Fold cloth over cushion and tap full length of feather strip flush with rail cap.
Tack Cloth
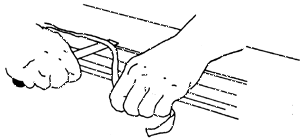
Pull cloth tightly downward and tack with four tacks along bottom rail. Pull cloth tightly over the end of rail and tack with three tacks in groove back of cushion reinforcing pad.
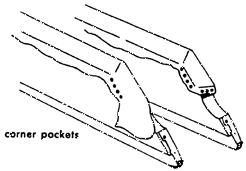
For side pockets, stretch cloth firmly over nose of cushion toward the bottom with distorting cushion shape. Tack cloth to rail bottom for approximately 2" from pocket opening.
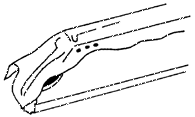
Snip cloth at no. and pull small strip down to groove, tack in place as shown. then snip excess cloth leaving enough for small fold at the top as shown.
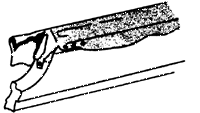
Hold small fold at top in place, then fold entire piece over. Tack at bottom of rail with (3) tacks and (3) at groove. Stretch balance of cloth tightly over cushion and tack at bottom of rail, starting at the center, and working toward the ends. Space tacks about 2" apart. Be sure cloth is snug, but not tight enough to alter shape of the cushion.
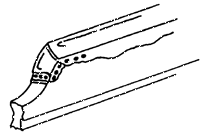
- Trim excess cloth from rail
For pool tables with removable cushions:
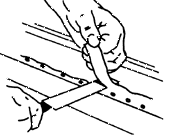
First remove the old cloth and all of the old staples. Be careful to note how the cloth has been applied. It will be helpful to you in replacement of the new covering. Cut the cloth approximately 6 inch. longer than the rail and allow the ends to extend about 3 inches over each end of the rail as in Figure "A". Staple the cloth to the top edge of the back of the rail starting and stopping the staples about 3 inches from the ends. The cloth should be allowed to lap over the back about % inch and stretched in the length while driving staples about % of inch apart.
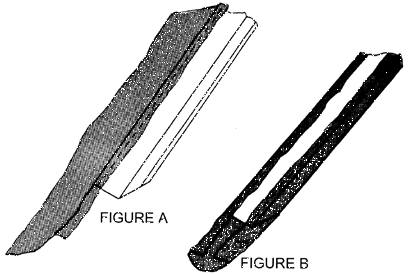
Second, pull the cloth tightly around the front of the rail and staple to the bottom edge of the back of the rail in the same manner as Step 1. If the cloth is too wide, the extra material can be trimmed off after the second stapling operation. This trim should be about % of an inch from the staples as shown in Figure "B".
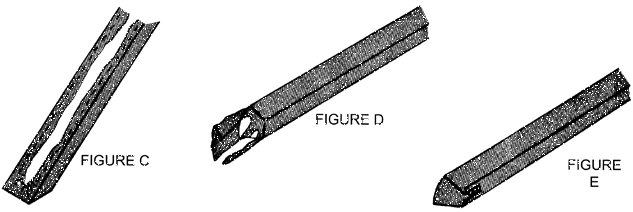
For comer pockets, stretch the cloth over the angled face of the rail and staple to the back allowing small even wrinkles as shown in Figure "C" on the back side. NOTE: Care should be taken to stretch before wrapping around to the back side so that the sharp part of the angle cut will not tear or cut the cloth.
For side pockets, finish stapling the back edge and slit as shown in Figure "D". Pull the front section over the nose of the rail tightly and staple to the back side. Snip the excess material off leaving enough for a small fold which should be pulled down across the front and stapled to the bottom of the rail as shown in Figure "E". Be sure all excess cloth is snipped off to allow the cushion rail to set tightly when fastened on to top mil and bed.
You can also view these steps as a .pdf file. It is a printable set of instructions for installing billiard cloth
Pool Table Cloth Installation Guide
- Title: Pool Table Cloth Installation Guide
- Author: billiardsforum (Billiards Forum)
- Published: 3/16/2021 5:33:17 PM
- Last Updated: 3/17/2021 4:49:22 AM
- Last Updated By: billiardsforum
Pool Table Cloth Installation Guide
Pool Table Cloth Installation Guide Comments
There are not yet any comments. Please post one below. All comments are moderated.
Reply and share your comments below:
